Skip to content

WD ShareSpace: Replacing a Failed Drive with a New Model

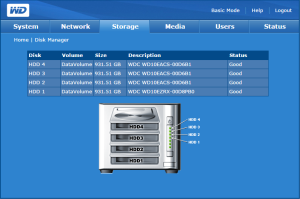
I had a hard drive failure in my Western Digital ShareSpace 4TB NAS. I discovered that the drive model in the chassis was no longer available. The manual says that replacement drives must be the same “model and size.” For anybody wondering if you can use a different WD Caviar Green drive, it appears that you can. My NAS has been successfully rebuilt.

SS-Drives

Cisco Config Backup Redux – SNMP This Time

We recently installed new routers and voice gateways, and I was torn between enabling telnet or figuring out a better way to perform my config backups. I’m still a big believer in security and free solutions, so I went on the hunt and dug into using SNMP. As it turns out, the hardest part about using SNMP to back up a Cisco config is getting the MIBs installed on your particular distro. Using Debian this time, I had a pretty simple go of it. Once you get net-snmp figured and get your MIBs installed into the right path, you just have to add CISCO-CONFIG-COPY-MIB to your snmp.conf and you’re ready to roll.


Here’s the bash script I wrote to automate a config backup of my entire organization. The only prerequisite to the script is a simple text file of all of your hosts. Maintaining the text file is the only hard part.

#!/bin/bash
budir=/tftpboot/cfg-`date +%Y-%m-%d-%H%M`       #Backup directory
snmpcom=private                                 #SNMP Community goes here (Must be RW)
s=10.1.1.10                                     #IP of your TFTPD
rslist=/root/bin/backup/rslist                  #Path to Router/Switch list, one per line
r=$(($RANDOM%1000))                             #Random number to be used for snmpset
#################################################
mkdir $budir                                    #Create backup directory
for a in `cat $rslist`
do
        touch $budir/$a                         #These two lines are only required if your
        chmod 777 $budir/$a                     #tftpd doesn't support the -c (create) option

        #This line is the actual snmpset command to set all of the variables.
        snmpset -v2c -c $snmpcom $a ccCopyProtocol.$r i tftp \
                ccCopySourceFileType.$r i runningConfig \
                ccCopyDestFileType.$r i networkFile \
                ccCopyServerAddress.$r a $s \
                ccCopyFileName.$r s $budir/$a

        #This line is the one that actually triggers the backup.
        snmpset -v2c -c $snmpcom $a ccCopyEntryRowStatus.$r i active
done


Save this script and create a cron job and you’re all set.

Cisco SQL Query – Who can make long distance calls?

We restrict who gets access to make long distance calls to save money. As a result, when we designed our CUCM environment, we created separate Calling Search Spaces (CSS hereafter) for local, long distance, and international calling.

Occasionally I’ll be asked to produce a list of the people who currently have access to make long distance calls. Since we have conventionalized the LD CSS names by building (using XX_LD_CSS where XX is the building code) I was able to do this in one line:

run sql select name, dnorpattern, alertingname from numplan n, callingsearchspace c where n.fkcallingsearchspace_sharedlineappear = c.pkid and c.name like '___LD_CSS'

While underscores exist in the CSS names, the first two are used as wildcards in the query. This could also be done for a specific CSS with the following:

run sql select name,dnorpattern, alertingname from numplan n, callingsearchspace c where n.fkcallingsearchspace_sharedlineappear = c.pkid and c.name = 'XX_LD_CSS'


Inter-VLAN Wake on LAN

I was trying to get Wake on LAN (WOL) working across VLANs, and across WAN links. I found this Cisco article on the subject to be the most helpful, but it didn’t spell everything out as I’d hoped. This post aims to be a little more specific.


The first thing to do is to find out what port you need to open. If you’re using SCCM, you have the opportunity to specify the port, but if you’re using a standard WoL client (and there’s no shortage of clients out there) you’ll have to know which one it uses. The fastest way to do that is with Wireshark:

WOL Capture

Wireshark capture filter for WOL

I saw lots and lots of tips and tricks for filtering wake-on-LAN traffic, and they were all very complicated. Only one page finally referenced what I’d hoped was true all along; All you need is to type ‘wol’ into the filter box to filter for WoL traffic.


Once you have your filter set and a capture is in progress, you just need to induce some WoL traffic with your client. This example uses a command line client I found online:

WoL Client
Sending a WoL packet with a command line client

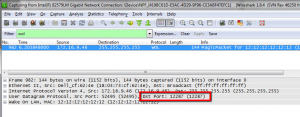
Now take a look at your Wireshark buffer. You should see some WoL traffic, and the lower pane will tell you what port the traffic is headed for:

Finding WoL UDP Port

Finding WoL UDP Port

Now that we know the port (in this case, 12287) we can configure our L3 device. In my environment, I’ll be sending WoL packets from a segment that uses a Cisco 3550 Layer 3 Switch to route. On this device, the command to forward UDP traffic is as such:

Layer3Switch(config)#ip forward-protocol udp 12287

4

The last trick to getting WoL working is to set up helper addresses on the VLAN that houses the source traffic. The purpose of these helper addresses is to forward broadcasts to other segments. Since this is technically broadcast traffic, we need to enter the broadcast addresses of the destination segments:

Layer3Switch(config)#int vlan1
Layer3Switch(config-if)#ip helper-address 172.16.138.255

5

In this example I’m forwarding WoL Packets from VLAN1 to the broadcast IPs of a few other networks. If you provisioned your VLANs originally, you might remember helper-address from DHCP configuration requirements for servers delivering DHCP addresses to clients on different VLANs. This is a very similar use of the feature, except that in this case we’re using the broadcast address of a network segment as the helper address, instead of a DHCP server.

That’s it! As I mentioned earlier, many sites listed far more steps to the process. After some troubleshooting, I found that only the ip forward and the helper address were necessary to send WoL packets to the other side successfully.

Converting PCL to PDF and Adding Bookmarks

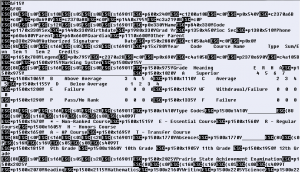
When we upgraded our student information system (SIS), I was charged with finding a way to retrieve all of the existing historical student transcripts from the old system and put them into a usable format. Using the proprietary menu, I ran several batch transcript exports (by graduation year) and discovered the the system outputs the files in raw PCL format:

transcript-pcl

I found a tool called GhostPCL to convert these files to PDF. This is a simple enough operation in either Linux or Windows:

transcript-params


Once this is complete, you have a PDF, but no bookmarks. Since a grad year could contain hundreds and hundreds of students, I needed a way to get to a specific record without doing a PDF search. Incidentally, PDF searching worked fine, I just felt that it took too long to perform. I wanted to add some bookmarks.

I did some searching and came up with JPdfBookmarks, which allows you to insert bookmarks from a text file using a specific format. The only thing left to do was to generate the text file containing the links. I took a closer look at the original PCL file and discovered that the position of the student name appeared in the same place on every transcript. This, of course, is by design, and achieved by using the PCL code to insert text at specific coordinates. When I searched for a student name, I determined that the notable coordinates for my specific document were 150×330. Using a simple grep for the PCL code to insert at those coordinates:

grep p150x330 filename.pcl

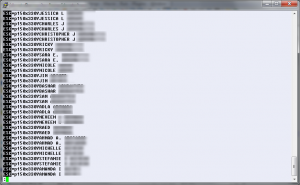
I’m left with a list of names, in order:

transcript-grep

At this point, all I needed to do was pipe the output of this command to a file and scrub the data to look like what JPdfBookmarks expected. The easiest way I could think of to do this was to use Notepad++ and Microsoft Excel. I piped the output to a file using Linux:

grep p150x330 filename.PCL > namelist.txt

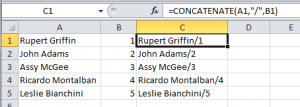
The next step is to open that file in Notepad++ and remove the garbage to the left of the names with a search and replace. Once I had a clean file with just names, I headed over to Microsoft Excel to add the finishing touches. The simplest input file format for JpdfBookMarks requires the bookmark name (which in this case is the same as the student name I already had), a forward slash, and the page number. Since I knew that the names were in the correct order, and that there was one transcript per page, I could simply append the slash and the page number using the CONCATENATE function:

=CONCATENATE(a1,"/",b1)

This assumes column A has the student names and column B has the page numbers. Column B is just an Autofill.

trans-excel


Now that I had the PDF files and the bookmark files, it was just a matter of merging them using the toolbar button in JPdfBookmarks:

trans-jpdf


Now I have fully bookmarked PDF files, and though I started out with PCL files, I didn’t print a single sheet of paper in the process.


PowerTeacher Gradebook Preferences Won’t Open

This post is for you if:

– You use PowerSchool’s PowerTeacher Gradebook, and the Preferences dialog box won’t open, AND

– You use a read-only redirected desktop for your faculty.

We noticed that PowerTeacher Gradebook worked fine, except for the preferences dialog box. When you click ‘Preferences’, nothing would happen. After some digging with Procmon, I discovered that the only thing that happened when you clicked Preferences was a quick Java thread execution. No info there, so I dug deeper in the bowels of the Java console.

When the application loads, it makes some horrible assumptions about file locations, specifically the location for .gradebook_userdict.tlx.

The console shows the “User Home Dir” location, which was simply showing \\servername for us. This is because our Start Menus and Desktops are redirected from read-only shares on \\servername. While the Desktop is redirected to \\servername\DesktopShare$, the Gradebook client assumes the .gradebook_userdict.tlx file should be one level up, at \\servername.  Since that’s not a valid place to stash a file, I had to improvise.

The solution for redirected read-only desktops is to create the desktop redirection folder one level below a share, and not make the redirection to the share itself. I converted our redirect locations to a ‘resource’ share located at: \\servername\res$\desktopshare, which is transparent to the client, but serves a useful purpose in the ability to stash the .gradebook_userdict.tlx file in the root of the \\servername\res$ share. Of course, you also have to change your redirection targets in the respective GPO(s).

Incidentally, I called PS support, who chastised me for using Java 1.6 instead of their officially supported 1.5. I placated the support rep and installed 1.5, producing the same results.

Android Media Upload Issue – Solved

When I test drove the Android WordPress app, I had some issues uploading images:

Post ID# 11 added successfully, but an error was encountered when uploading media:

My solution was to correct the upload path in WordPress settings > media. Since this blog is hosted on a web host that graciously allows shell access, I did a `pwd` from my shell and found that it differed slightly from the preconfigured path in the WordPress media settings configuration. Updating the path fixed the issue, and I can now upload from the web UI as well as the Android app.

Cisco Config Backup on a Budget

With the new year in full swing, I thought it would be a good time to revisit some core concepts for good measure. Backing up Cisco device configurations is easy if you have software that does it for you, but what if you don’t? We don’t, and trying to convince the people in finance that we should buy software to do something that doesn’t directly affect the clients is nearly impossible. So there I was, in search of something that could automate the process. For free.

MRAT (Multi-Router Automation Tool, if I remember right) has long been dead, but its uses live on. If you have ever used mrat.pl, you know that it does exactly what it says it can do, and it’s up to you to make it fancy. I’m going to run through how I decided to do it.

First, let’s have a look at the command line switches for mrat:

-r <routersfile>

-c <commandfile>

-o <outputlog>

The output log is optional, but it can come in handy if you’re looking to obtain information about your devices.  That leaves us with the routers file, and the command file. The routers file (which doesn’t technically have to contain routers) is a colon-separated list of values, including optional special variables of your choosing. You can scrub together a list fairly quickly with copy/replace if you have a flat list of IP addresses for your devices. Here’s an example line from my list:

172.16.24.32:confusername::confpassword:172.16.1.2:172.16.24.32

This gives mrat the IP, username, password, and two additional variables (in this case: tftp server IP, and filename. I need the last two variables since I’m doing a config backup to tftp). I don’t use the hostname as the filename in this space because using the IP makes it easier to create the routers file. I will take care of finding hostnames later.

Now that I’ve got my switch/router list ready to go, let’s have a look at the command file. You can use any commands you want (I’ve used command files to gather information about IOS versions, router inventories, etc) but for backing up, we really only need to have a few simple lines in the command file. A command file example for config backup would look something like this:

copy run tftp://1.2.3.4/backupdirectory/filename
<carriage return>
<carriage return>
<carriage return>
exit

Notice that there is whitespace between the two lines (I typed <carriage return> to clarify). We need extra carriage returns to pass to the router. This will provide you with an easy way to back up a router config to a tftp server, but there’s a problem: the filename is static in this case (for that matter, so is the TFTP server IP). We can fix that. I put together a little bash script to streamline the process, and it goes like this:

########################################
# Enhanced mrat Backup Script          #
# Author: Jim                          #
########################################
cmdbudir=cfg-`date +%Y-%m-%d-%H%M`
budir=/tftpboot/$cmdbudir
tmp=backuptemp
########################################
mkdir $budir
chown nobody:nobody $budir
mkdir $tmp
########################################
echo copy run tftp://!var1/$cmdbudir/!var2 > $tmp/cmd
echo >> $tmp/cmd
echo >> $tmp/cmd
echo >> $tmp/cmd
echo >> $tmp/cmd
echo exit >> $tmp/cmd
########################################
echo -n mrat beginning...
./mrat.pl -r swlist -c $tmp/cmd
echo done.
########################################
echo -n Renaming files...
for a in `ls $budir`
do mv $budir/$a $budir/`grep hostname $budir/$a | awk '{print $2}'`
done
echo done.
########################################
echo -n Cleaning up...
rm -rf $tmp
echo done.

This script is fairly straightforward. It assigns some variables in the first section for the target backup directory name, and some temporary variables. The next section creates a date-stamped backup directory on the server and a temporary directory based on the variables from the first section.

Next, we create a custom command file to be used with mrat (which is run in the next section). This command file includes the “!var1” and “!var2” variables in order to leverage the flexibility of mrat. I have used var1 in this case as the TFTP server IP, and var2 as the filename.

Section 4 is where mrat is actually being run with the routerlist (in my case it’s called “swlist”) and our custom command file. For the sake of clarity, I have added another section to loop through the files that have been backed up while grepping out the hostnames and renaming the files. This keeps us from having to sort through config backups by IP and instead lets us use hostnames. This is just preference,  but I see a list of hostnames as an easier alternative to a list of IP addresses. If you have a proper addressing scheme for your management IPs, either way could potentially work fine.
Finally, the last section of the script is just cleanup. It deletes the temporary directory that was created in the second section.

When this script is finished running, you’ll have a date and time stamped directory that contains all of the config backups, with hostnames as filenames. You can take it a step further and gzip the configs right from the script, but since we have a relatively small shop I usually do that by hand. You could also cron this script and automate the process even further.

There are a few catches to this method:

1) If you don’t maintain the switch/router file, your backups will be incomplete. It is important to remember that the device list file must be maintained. I got myself in the habit of adding a new line to the swlist file every time a new device was added.

2) Make sure your devices are up and running before the backup runs. A non-responsive device will stall the script and cause mild headaches. I take a quick peek at the WhatsUp Gold network infrastructure section on my Home Workspace before I run this script to ensure that all of my devices are currently responding. If you administer a network of any size, you should be monitoring your devices for down situations anyway.

EDIT: The newest version of MRAT (0.63) fixes the non-responsive hanging issue! The newest version is available at http://www.serreyn.com/software/mrat/

Tagged

Cisco 6509 Temperature Monitoring with Cacti
Hey Everyone,

I wanted to get some simple intake/exhaust temperatures monitored with Cacti, but I hit a few snags. While I realize perfectly well that this is extremely old information, I couldn’t find anything about it on the InterTubes, so I’m going to post it to this little blog.

I have several 6509 engines, some with slightly varying physical configurations. For example, one particular switch has 6408 blades in slots 3 and 4, and a SUP720 in slot 5. Another has only one 6408, in slot 2, and a SUP720 in slot 5. I was assuming that pulling these values would be a simple cake[snmp]walk, but it turns out things aren’t so simple.

This is the relevant portion of the output from `sh env temp` on switch 1 (slots 3,4,5 populated) :

module 3 outlet temperature: 32C
module 3 inlet temperature: 27C
module 4 outlet temperature: 33C
module 4 inlet temperature: 27C
module 5 outlet temperature: 36C
module 5 inlet temperature: 29C

And this is the output from Switch 2 (slots 2 and 5 populated) :

module 2 outlet temperature: 31C
module 2 inlet temperature: 25C
module 5 outlet temperature: 37C
module 5 inlet temperature: 29C

Things are still hopeful at this point, but when I tried to create data templates for the OIDs, it got a little more interesting.  Using the OIDs returned from an snmpwalk of switch 2, I created data templates (and graph templates) in Cacti to graph the intake and exhaust temperatures for both slots. I discovered that these graphs were either inaccurate or broken when I applied them to switch 1.

I have since discovered that the OID indexing is done by the number of slots populated, and not by the slot number itself. Even if every one of your switches has a SUP720 in slot 5, the correct OIDs to monitor any of the temperature sensors for slot 5 may be different depending on what is in slots 1-4.

Here is the relevant output (with colors & comments) from an snmpwalk of switch 1 (slots 3,4,5 populated) :

enterprises.9.9.91.1.1.1.1.4.1001 = 1  <-- Value for 1st populated slot (6408)
enterprises.9.9.91.1.1.1.1.4.1002 = 32 <-- Value for 1st populated slot
enterprises.9.9.91.1.1.1.1.4.1003 = 27 <-- Value for 1st populated slot
enterprises.9.9.91.1.1.1.1.4.2001 = 1  <-- Value for 2nd populated slot (6408)
enterprises.9.9.91.1.1.1.1.4.2002 = 33 <-- Value for 2nd populated slot
enterprises.9.9.91.1.1.1.1.4.2003 = 27 <-- Value for 2nd populated slot
enterprises.9.9.91.1.1.1.1.4.3002 = 1  <-- Value for 3rd populated slot (SUP720)
enterprises.9.9.91.1.1.1.1.4.3003 = 35 <-- Value for 3rd populated slot
enterprises.9.9.91.1.1.1.1.4.3004 = 29 <-- Value for 3rd populated slot
enterprises.9.9.91.1.1.1.1.4.3005 = 41 <-- Value for 3rd populated slot
enterprises.9.9.91.1.1.1.1.4.3006 = 42 <-- Value for 3rd populated slot
enterprises.9.9.91.1.1.1.1.4.3007 = 30 <-- Value for 3rd populated slot
enterprises.9.9.91.1.1.1.1.4.3008 = 30 <-- Value for 3rd populated slot
enterprises.9.9.91.1.1.1.1.4.3009 = 30 <-- Value for 3rd populated slot
enterprises.9.9.91.1.1.1.1.4.3010 = 31 <-- Value for 3rd populated slot
enterprises.9.9.91.1.1.1.1.4.3011 = 31 <-- Value for 3rd populated slot
enterprises.9.9.91.1.1.1.1.4.3012 = 30 <-- Value for 3rd populated slot
enterprises.9.9.91.1.1.1.1.4.3016 = 38 <-- Value for 3rd populated slot
enterprises.9.9.91.1.1.1.1.4.3017 = 37 <-- Value for 3rd populated slot
enterprises.9.9.91.1.1.1.1.4.3020 = 45 <-- Value for 3rd populated slot
enterprises.9.9.91.1.1.1.1.4.3021 = 25 <-- Value for 3rd populated slot

Let’s compare this output to the same relevent section from switch 2 (slots 2,5 populated) :

enterprises.9.9.91.1.1.1.1.4.1001 = 1  <-- Value for 1st populated slot (6408)
enterprises.9.9.91.1.1.1.1.4.1002 = 29 <-- Value for 1st populated slot
enterprises.9.9.91.1.1.1.1.4.1003 = 23 <-- Value for 1st populated slot
enterprises.9.9.91.1.1.1.1.4.2002 = 1  <-- Value for 2nd populated slot (SUP720)
enterprises.9.9.91.1.1.1.1.4.2003 = 37 <-- Value for 2nd populated slot
enterprises.9.9.91.1.1.1.1.4.2004 = 29 <-- Value for 2nd populated slot
enterprises.9.9.91.1.1.1.1.4.2005 = 43 <-- Value for 2nd populated slot
enterprises.9.9.91.1.1.1.1.4.2006 = 43 <-- Value for 2nd populated slot
enterprises.9.9.91.1.1.1.1.4.2007 = 30 <-- Value for 2nd populated slot
enterprises.9.9.91.1.1.1.1.4.2008 = 29 <-- Value for 2nd populated slot
enterprises.9.9.91.1.1.1.1.4.2009 = 29 <-- Value for 2nd populated slot
enterprises.9.9.91.1.1.1.1.4.2010 = 29 <-- Value for 2nd populated slot
enterprises.9.9.91.1.1.1.1.4.2011 = 30 <-- Value for 2nd populated slot
enterprises.9.9.91.1.1.1.1.4.2012 = 30 <-- Value for 2nd populated slot
enterprises.9.9.91.1.1.1.1.4.2016 = 35 <-- Value for 2nd populated slot
enterprises.9.9.91.1.1.1.1.4.2017 = 35 <-- Value for 2nd populated slot
enterprises.9.9.91.1.1.1.1.4.2020 = 45 <-- Value for 2nd populated slot
enterprises.9.9.91.1.1.1.1.4.2021 = 26 <-- Value for 2nd populated slot

A few things to note here:

  • The index number for the SUP module changes depending on which slots above it are populated.
  • The temperature values returned for the SUP module are significantly more comprehensive than those of the 6408 (this is a no-brainer, but it bears mentioning for ease of reading the output above.)
  • The first entry for each of the 6408 OIDs is “x001” and the value is 1. The temperature readings are “x002” (exhaust) and “x003” (intake), but this is not the case for the SUP720. For the SUP270, the first OID returned is “x002”, and that value is 1. The temperature sensors for egress and ingress return on “x003” and “x004”, respectively. This throws a particularly nasty monkey wrench into the mix when trying to plot these values using data templates.

Now that I know this information, I’m still stuck with a relatively kludgy solution: create individual data templates for each scenario and apply graphs on a per-device basis.  Since I like to automate things, this does stick in my craw, but because I have a fairly low number of 6509s and, as it turns out, only two different physical configuration layouts, it’s acceptable. For now.

Tagged ,

Welcome to RackBuzz

Hello There. I’d like to welcome you to RackBuzz.com, a site for everything from tips & tricks to IT horror stories. I find my daily grind rife with interesting stories and various discoveries, so I wanted to establish a place to put it all down for the world to see. Who knows? You may find something fun to read. I guarantee nothing, however.